import java.io.ByteArrayInputStream;
import java.io.IOException;
import java.io.InputStream;
import java.net.MalformedURLException;
import java.net.URL;
import java.util.Iterator;
import javax.xml.stream.XMLEventReader;
import javax.xml.stream.XMLInputFactory;
import javax.xml.stream.XMLStreamException;
import javax.xml.stream.events.Attribute;
import javax.xml.stream.events.Characters;
import javax.xml.stream.events.XMLEvent;
import 앞전소스들.Feed;
import 앞전소스들.FeedMessage;
/**
* @author torrms
*
*/
public class RSSFeedParser {
static final String TITLE = "title";
static final String DESCRIPTION = "description";
static final String LANGUAGE = "language";
static final String LINK = "link";
static final String AUTHOR = "author";
static final String ITEM = "item";
static final String LAST_BUILD_DATE = "lastBuildDate";
//message
static final String PUB_DATE = "pubDate";
static final String CATEGORY = "category";
static final String THUMBNAIL = "thumbnail";
final URL url;
public RSSFeedParser(String feedUrl) {
try {
this.url = new URL(feedUrl);
} catch (MalformedURLException e) {
throw new RuntimeException(e);
}
}
public Feed readFeed() {
Feed feed = null;
try {
boolean isFeedHeader = true;
// Set header values intial to the empty string
String description = "";
String title = "";
String link = "";
String language = "";
String author = "";
String lastBuildDate = "";
String category = "";
String pubDate = "";
String thumbnail = "";
// First create a new XMLInputFactory
XMLInputFactory inputFactory = XMLInputFactory.newInstance();
// Setup a new eventReader
InputStream in = read3();
XMLEventReader eventReader = inputFactory.createXMLEventReader(in);
// read the XML document
while (eventReader.hasNext()) {
XMLEvent event = eventReader.nextEvent();
if (event.isStartElement()) {
String localPart = event.asStartElement().getName()
.getLocalPart();
switch (localPart) {
case ITEM:
if (isFeedHeader) {
isFeedHeader = false;
feed = new Feed(title, link, description, language,lastBuildDate);
}
event = eventReader.nextEvent();
break;
case TITLE:
title = getCharacterData(event, eventReader);
break;
case DESCRIPTION:
description = getCharacterData(event, eventReader);
break;
case LINK:
link = getCharacterData(event, eventReader);
break;
case LANGUAGE:
language = getCharacterData(event, eventReader);
break;
case AUTHOR:
author = getCharacterData(event, eventReader);
break;
case LAST_BUILD_DATE:
lastBuildDate = getCharacterData(event, eventReader);
break;
case PUB_DATE:
pubDate = getCharacterData(event, eventReader);
break;
case CATEGORY:
category = getCharacterData(event, eventReader);
break;
case THUMBNAIL:
thumbnail = getCharacterData(event, eventReader);
// ex ) <media:thumbnail url="https://imgnews.pstatic.net/image/thumb140/5551/2019/09/04/60286.jpg"/> 형태이므로
@SuppressWarnings("unchecked") Iterator<Attribute> attribue = event.asStartElement().getAttributes();
while(attribue.hasNext()){
Attribute myAttribute = attribue.next();
if(myAttribute.getName().toString().equals("url")){
thumbnail = myAttribute.getValue();
}
}
break;
default:
//System.out.println("localPart:"+ localPart);
break;
}
} else if (event.isEndElement()) {
if (event.asEndElement().getName().getLocalPart() == (ITEM)) {
FeedMessage message = new FeedMessage();
message.setAuthor(author);
message.setDescription(description);
message.setLink(link);
message.setTitle(title);
message.setCategory(category);
message.setPubdate(pubDate);
message.setThumbnail(thumbnail);
feed.getMessages().add(message);
event = eventReader.nextEvent();
continue;
}
}
}
} catch (XMLStreamException e) {
throw new RuntimeException(e);
}
return feed;
}
private String getCharacterData(XMLEvent event, XMLEventReader eventReader)
throws XMLStreamException {
String result = "";
event = eventReader.nextEvent();
if (event instanceof Characters) {
result = event.asCharacters().getData();
}
return result;
}
// 기존 리더
// private InputStream read() {
// try {
// return url.openStream();
// } catch (IOException e) {
// throw new RuntimeException(e);
// }
// }
private InputStream read3() {
try {
ReplacingInputStream ris = new ReplacingInputStream(url.openStream(), "'", "'");
return ris;
} catch (IOException e) {
throw new RuntimeException(e);
}
}
public static InputStream byteArrayToInputStream(byte[] srcBytes) {
return new ByteArrayInputStream(srcBytes);
}
}
기존의 리더리를 통해 읽어서 테스트를 진행 하도록 했습니다.
정보는 정리가 되어 잘 오고 있었습니다. 그런데...
원정보
...
<title>'미드 체르노빌....' XXXX </title>
...
출력정보
...
title = '
...
그렇습니다. 기존의 단순 url.openStream 으로 InputStream 으로는 따옴표가 읽혀 지지 않습니다.
작은 따옴표(싱글 퀘테이션) 등이 말썽으로 원천의 스트림을 출력해보면
'미드 체르노빌 ...
위와 같이 읽어 오는 것이 바로 치환이 되버려서 오는 겁니다.
짜증이... 변환이 필요합니다. replace 처럼요... 물론 replace를 쓸수는 없습니다. 스트림이니까요
외국에 깃 양반을 검색합니다. .... 검색중... 그렇습니다. 전 할 줄 모르고 구글이 해줍니다. ^^;
마침네. simon 이란 시몬이란 양반이 만들어 놓은게 있습니다. 데려옵니다.
두둥, ReplacingInputStream 클래스가 바로 그것입니다.
ReplacingInputStream .java
import java.io.FilterInputStream;
import java.io.IOException;
import java.io.InputStream;
import java.util.Iterator;
import java.util.LinkedList;
import java.util.Queue;

/**
 * Created by simon on 8/29/17.
 */
public class ReplacingInputStream extends FilterInputStream {

    private Queue<Integer> inQueue, outQueue;
    private final byte[] search, replacement;

    public ReplacingInputStream(InputStream in, String search, String replacement) {
        super(in);

        this.inQueue = new LinkedList<>();
        this.outQueue = new LinkedList<>();

        this.search = search.getBytes();
        this.replacement = replacement.getBytes();
    }

    private boolean isMatchFound() {
        Iterator<Integer> iterator = inQueue.iterator();

        for (byte b : search) {
            if (!iterator.hasNext() || b != iterator.next()) {
                return false;
            }
        }

        return true;
    }

    private void readAhead() throws IOException {
        // Work up some look-ahead.
        while (inQueue.size() < search.length) {
            int next = super.read();
            inQueue.offer(next);

            if (next == -1) {
                break;
            }
        }
    }

    @Override
    public int read() throws IOException {
        // Next byte already determined.

        while (outQueue.isEmpty()) {
            readAhead();

            if (isMatchFound()) {
                for (@SuppressWarnings("unused") byte a : search) {
                    inQueue.remove();
                }

                for (byte b : replacement) {
                    outQueue.offer((int) b);
                }
            } else {
                outQueue.add(inQueue.remove());
            }
        }

        return outQueue.remove();
    }

    @Override
    public int read(byte b[]) throws IOException {
        return read(b, 0, b.length);
    }

    // copied straight from InputStream inplementation, just needed to to use `read()` from this class
    @Override
    public int read(byte b[], int off, int len) throws IOException {
        if (b == null) {
            throw new NullPointerException();
        } else if (off < 0 || len < 0 || len > b.length - off) {
            throw new IndexOutOfBoundsException();
        } else if (len == 0) {
            return 0;
        }

        int c = read();
        if (c == -1) {
            return -1;
        }
        b[off] = (byte)c;

        int i = 1;
        try {
            for (; i < len ; i++) {
                c = read();
                if (c == -1) {
                    break;
                }
                b[off + i] = (byte)c;
            }
        } catch (IOException ee) {
        }
        return i;
    }
}
사랑해 줍니다.
그러면 문제가 해결되어 나오게 됩니다. 아~ 테스트 소스도 올립니다.
단, json 이나 여타 다른 정보는 설정이 된 상태에서 합니다.
따라서 java APP 소스와 컨트롤러( Controller )는 상황에 맞게 하시면 됩니다.
JAVA
import 앞전소스.Feed;
import 앞전소스.FeedMessage;

/**
 * @author torrms
 *
 */
public class testRss {

	/**
	 * @param args
	 */
	public static void main(String[] args) {
		// TODO Auto-generated method stub
		RSSFeedParser parser = new RSSFeedParser(
                "http://newssearch.naver.com/search.naver?where=rss&query=3D 프린터");
        Feed feed = parser.readFeed();
        System.out.println(feed);
        for (FeedMessage message : feed.getMessages()) {
            System.out.println(message);

        }
	}

}
Controller
// 네이버 뉴스 RSS 테스트(웹) /////////////////////////////////////////////////////////////////////////////////////////
	@RequestMapping(value = "/getNewsRSSAjax.json")
	public ModelAndView getNewPage(@RequestParam Map<String, Object> commandMap) {

		ModelAndView mv = new ModelAndView();
    	mv.setViewName("jsonView");


		log.info("getNewPage");
		String result = "false";

		try {
			String keyword = (String) commandMap.get("keyword");
			String maxcnt = (String) commandMap.get("maxcnt");
			String Url = "http://newssearch.naver.com/search.naver?where=rss&query=" + keyword;
			log.info("Url:" + Url);

			RSSFeedParser parser = new RSSFeedParser(Url);
			Feed feed = parser.readFeed();
			feed.getMessages();

			// TODO 방식 고려
			// 메모리 방식으로 변경을 고려해야함 RSS 너무 자주 부르게 되므로
			List<Map<String, Object>> listMap = new ArrayList<Map<String, Object>>();

			int i = 0 ;
			int maxcnt_int = 0;

			if (maxcnt != null)
				maxcnt_int = Integer.valueOf(maxcnt)+1;

			for (FeedMessage message : feed.getMessages()) {
				i++;
				if (i == maxcnt_int)
					break;
				Map<String, Object> obj = new HashMap<String, Object>();

				obj.put("title"        , message.getTitle()          );
				obj.put("link"         , message.getLink()            );
				obj.put("description"  , message.getDescription()     );
				obj.put("pubdate"      , message.getPubdate()         );
				obj.put("author"       , message.getAuthor()          );
				obj.put("category"     , message.getCategory()        );
				obj.put("thumbnail"    , message.getThumbnail()       );
//				System.out.println(message);
//				System.out.println(obj);
				listMap.add(obj);
			}
			mv.addObject("resultList",listMap);
			result = "true";

		} catch (NullPointerException e) {
			log.info("NullPointerException :"  + e.toString());
		} catch (Exception e) {
			log.info(e.toString());
		}
		mv.addObject("result", result);
		return mv  ;
	}
WEB
<div id="RSS">
        </div>

<!-- jquery 선언 후-->

 <script type="text/javaScript" >
 // 시작
    $(function(){
        /////////////////////////////////////////////////////////////////////////
        //RSS 가져오기
        $.ajax({
            url:"<c:url value='/getNewsRSSAjax.json' />", //요청할 데이터 경로.
            type: 'GET',
            data:{
            	keyword: "3D 프린터",
            	maxcnt: "5",
                },
            dataType: "json", //요청할 데이터에 타입.
            crossDomain: true,
            success: function (data) { //성공적으로 요청했왔을 때...

                console.info(data);
                $.each(data.resultList,function(i, d){
                    var title=d["title"]; //title 키의 값을 가져옵니다.
                    var date=new Date(d["pubdate"]); //뉴스 작성 날짜 객체 생성
                    var img=d["thumbnail"];
                    var dateString = date_to_str(date);
                    $("#RSS").append("<ul style='height:140px;'><li><img src='"+img+"'/></li><li>" + title+ "</li><li>" + dateString+ "</li></ul><br/>" );

                });

                },
                error: function (response) {
                      console.info(response.status);
                      console.info(response.error);
                  }     // “success: function”에 종료
            }); // $.ajax() 메서드에 종료

    </script>
아놔 정보들을 모두 백업하고 진했으니 망정이지... (DDL이랑 몇가지 테이블 레코드 정보들...)
이건 검색을 좀 했더니 몇개의 글을 발견했지만 딱히 맞는지는 모르겠습니다.
도커 살리기
power shell 에서 아래 명령으로 1..10은 이미지 범위 일것으로 보이니 맞게 설정하여 가져오기를 시도 합니다.
hello-world-nginx 콘테이너도 올리고요
for i in {1..10}; do docker run -itd -P kitematic/hello-world-nginx; done
위 문제는 종종 발생하고 정상 종료(?) 를 한 경우는 잘 발생하지 않는다고들 합니다만 대비는 해야 할듯합니다.
- Hostname/Ports 설정의 공중부양
mysql 설정은 개인 로컬 서버 (포트 설정 3306 -> 23306) 설정을 진행했습니다.
다음날 봐야지 하고 봤더니 DB랑 포트 설정이랑 슝~
테이블이 날라가기도 하고 이걸 참네..
- 2019-08-30 이어서... 현재 상태
문제가 완전히 해결 되지 않습니다.
내부 설정이 모두 날아가고 다시 테이블, 사용자를 다시 설정하는 이상한 형태로 살아남니다.
심지어 어떨때는 포트가 잡혀서 아에 구동도 되지 않고 포트도 사용 불능에 빠집니다.
어허이... 아직 버그가 많습니다. 이유는 모르겠지만 포트를 잡아 먹고 놓아 주질 않습니다.
아마도... 완벽히 종료가 되지 않고 PC 가 종료 되는 모양새 입니다.
환경은 windows 10 pro 입니다.
지금으로썬 테스트 중입니다.
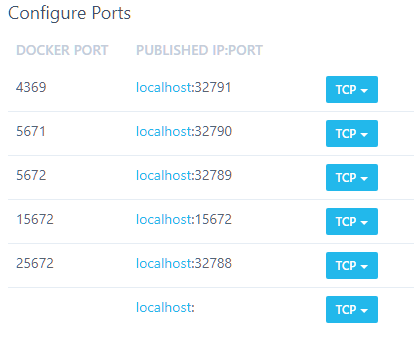
포트 먼저 확인
포트를 확인합니다.
도커는 구동을 하고 있지 않은 상태 인데
왼쪽 스샷 처럼 구동이 되어있는 backend 상태 입니다.
그래서 프로세스를 죽이지 않는 한 살아 있는 샘이죠 taskkill -f /PID [프로세스ID] 로 종료를 할듯합니다.
d:\에 a.vbs 는 프로세스 및 포트를 알려주는 스크립트 입니다. 첨부하면 바이러스 일줄 아니 파일을 생성하고 하세요.
소스는 아래 넣습니다.
a.vbs
set fso = createobject("scripting.filesystemobject") set sh = createobject("wscript.shell") set oExec = sh.exec ("tasklist") do while not oExec.stdout.atendofstream line = oExec.stdout.readline processes = processes & trim(left(line,27)) & "," PIDs = PIDs & trim(mid(line,30,6)) & "," loop PID = split(PIDs,",") Process = split(processes,",") set oExec = sh.exec ("netstat -ano") wscript.echo "Port"&vbtab&"PID"&vbtab&"CMD" do while not oExec.stdout.atendofstream line = oExec.stdout.readline flag = true if mid(line,3,3)<>"TCP" then flag=false if mid(line,10,1)<>"0" then flag=false if mid(line,56,9)<>"LISTENING" then flag=false if flag = true then port = trim(mid(line,18,5)) netpid = trim(mid(line,72)) for x = 0 to ubound(PID) if netpid = PID(x) then exit for next cmd = "-" if x <= ubound(PID) then cmd = Process(x) wscript.echo port&vbtab&netpid&vbtab&cmd end if loop